Does a Cricut make stencils
Create personalized stencils for your paper crafting, add a pattern to your dining room wall, or help your kids build that lemonade stand they see in their dreams. Cricut Stencil Vinyl lets you cut and apply your designs to just about any project, whether working with wood, canvas, plastics, paper, or more.
What material do I use to make a stencil with Cricut?
- Stencil vinyl is made specifically to make stencils with your Cricut machine and it’s self-adhesive.
- Removable adhesive vinyl has a sticky backing and should peel back easily from your project.
- Permanent adhesive vinyl is also sticky but will create a stronger bond with any surface you add it to.
Can Cricut explore AIR 2 make stencils?
You can make your own stencils using your Cricut machine in less time than it takes to say your stencil slogan! … I’m gonna show you how I made my own stencils using my Cricut Explore Air 2 that can be used on pillows, wall canvas’, and more.
Can you make a reusable stencil with Cricut?
You can easily make a one-time use stencil on a Cricut using any removable vinyl. … In that case, you need a reusable stencil – something that you can apply – paint – remove – reapply – paint, and so on.Can you use permanent vinyl as a stencil?
Can you use vinyl as a stencil? Yes, you definitely can, and today I am walking you through the step-by-step instructions so that you can easily learn how to use vinyl as a stencil the right way.
What can I use to make my own stencils?
Stencils are typically cut from a thin material that can hold its form—cardboard, plastic sheets, and metal are popular options. You could use paper, but it might rip or tear after repeated use. Plastic sheets, such as mylar, are the best option for making stencils by hand.
Can you use regular vinyl for a stencil?
stencil vinyl. If you are familiar with regular vinyl, you know that once you pull it up, you can’t use it again. Stencil vinyl is thicker than regular vinyl which enables you to use the stencil over and over again instead of just once. Open up the file in your Cricut or Silhouette software.
How do I turn a picture into a stencil?
- Get a Photo. Prepare the photo. …
- Put Photo into Word. Add it by either pasting, dropping, or importing the image into the program.
- Change Photo to Black and White. …
- Play With Buttons. …
- Copy and Paste into Paint. …
- Save and Print.
What material is best for making stencils?
The most common material for stencils is Mylar – and for good reason. It is flexible, durable, easy to clean and long lasting. 10mil Mylar is our preferred thickness for its flexibility, durability and versatility. Other options include adhesive backed mylar, magnetic, acrylic or wood stencils.
What is the difference between stencil vinyl and regular vinyl?What is Stencil Vinyl? It is vinyl that is made specifically to be used as a stencil. It’s edges are supposed to seal to your project better than regular vinyl. When the edges seal better, there is less likeliness of paint seeping under the edge and more likeliness of crisp lines.
Article first time published onCan you use Cricut transfer tape as a stencil?
There are many ways to make a stencil with your Cricut using contact paper, vinyl, transfer tape or reusable mylar sheets. … Stenciling on fabric or even wood can look so much more professional if you do it right.
Do you let paint dry before removing stencil?
Let the paint dry for a bit before you remove the stencil. This will help ensure that you don’t accidentally smear or smudge the paint. Use a good brush and stencil cleaner to clean and preserve your brush and stencil for future use.
What can I use instead of stencil vinyl?
The Dollar Tree and Deals sell rolls of Con-Tact Quick Cover Clear Self-Adhesive Shelf Liners for just $1 ($2 at Deals) that is a great substitute for Silhouette Stencil Vinyl.
Can Cricut cut Mylar?
Heavy duty industrial grade cutters like the Cricut Maker can cut 7 and 10 mil mylar.
What is the easiest way to cut a stencil?
Start Cutting the Stencil Always use a sharp craft knife start cutting out the stencil. A blunt blade makes the task more difficult and increases the risk that you’ll get frustrated and less careful with it. Begin cutting along the longest, straightest edges of the stencil design as these are the easiest.
Can Cricut cut stencil plastic?
Cricut Stencil Vinyl lets you cut and apply your designs to just about any project, whether working with wood, canvas, plastics, paper, or more.
What wood is used for Cricut signs?
1×2 lumber that’s long enough to cover the perimeter of your sign. wood stain and/or paint. Cricut (I’m using my Explore Air 2) stencil vinyl.
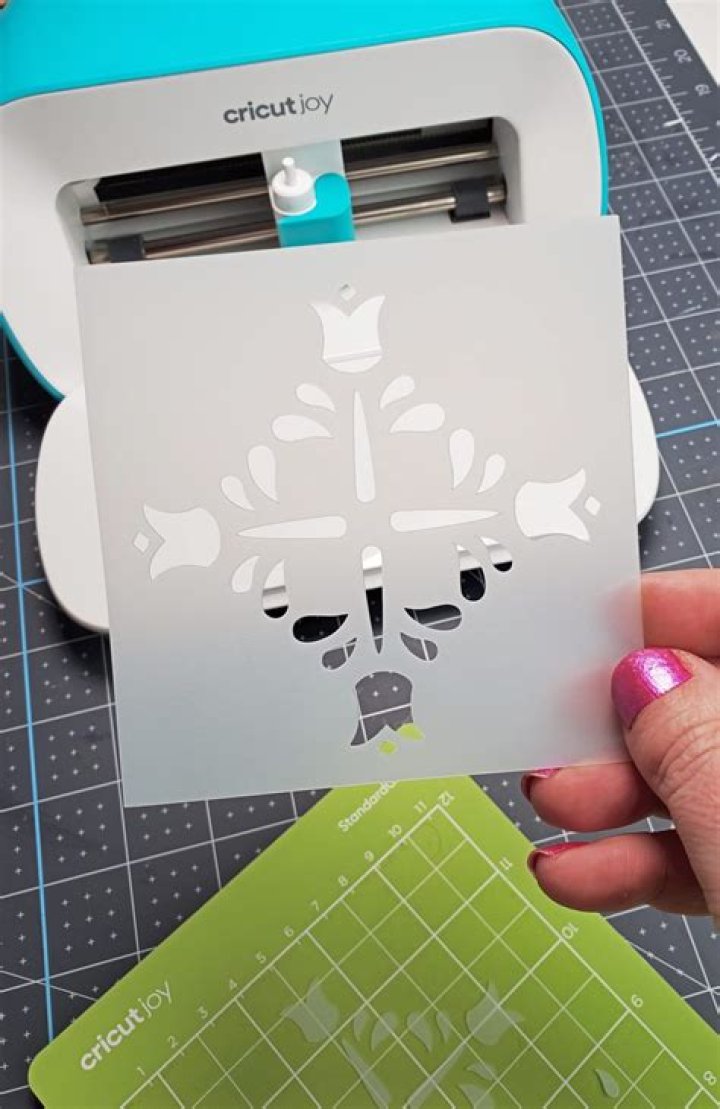
What is Cricut stencil vinyl used for?
Cricut stencil vinyl lets you cut and apply your designs to just about any project, whether working with wood, canvas, plastics, paper or more. The adhesive back helps prevent stencil shifting or color bleed around the edges.
How do you make a simple stencil?
- Find a pattern you love. I found my pattern via shapes in Photoshop. …
- Line up your stencil design and Mylar sheet square and even.
- Trace your stencil design. …
- Cut out your traced stencil pattern. …
- Your stencil is ready to use!
How do I make a picture look like a drawing without Photoshop?
- Marker effect.
- Pencil Greyscale effect.
- Pencil Sketch effect.
- Line Drawing effect.
- Chalk Sketch effect.
What is stencil picture?
stenciling, in the visual arts, a technique for reproducing designs by passing ink or paint over holes cut in cardboard or metal onto the surface to be decorated.
Can Cricut cut out letters?
Whether you’re designing an interactive board or one that sparks conversation, cutting letters is made easy using a cutting machine. This tutorial is for a Cricut® Explore Air 2 or Cricut® Maker (affiliate links).
How do you make a large stencil with a Cricut?
- Step 1: Upload Stencil File in Cricut Design Space.
- Step 2: Resize File in Cricut Design Space.
- Step 3: Zoom Out.
- Step 4: Insert Shapes.
- Step 5: Unlock Square.
- Step 6: Resize Square.
- Step 7: Duplicate Square.
- Step 8: Move to Front.